Sunday, November 1, 2009

How to post large photos and images?


Photo: István Lázár, Hungary

Canada 2009


This style is great for a photo blog with large photos and images.

Click here to learn how to post large photos and images in your blog.

Read more...

Installing the template in your NEW BLOG

It's not too difficult...just follow these steps:

Download the template and save it in your computer (as xml file).

Go to your Layout > Template > Edit HTML page.

Choose the file from the Browse... button, and then click to the Upload button.

It may ask you to delete some widgets - so just delete them. (Widgets are the extra page element added to the sidebars).

Save it. You're done! View your new blog.


Download here


or

Download here


Next step: Save in your computer


Upload the template


and Save it.

View the blog. This is the original PhotoblogIII template

Go to back the Layout > Template > Edit HTML page.
Click the Expand Widget Templates (EWT) button.


Now we will change some codes.


Please follow next 18 little steps.


The end of the procedure your new blog will be very professional and beautiful.


Click here to start.


Read more...

Installing the template in your OLD BLOG

Before you start changing your template, make sure you save your old template file just in case you need to start again.

METHODS TO INSTALL BLOGGER TEMPLATES

Download the template and save it in your computer (as xml file).

Go to your Layout > Template > Edit HTML page.

Choose the file from the Browse... button, and then click to the Upload button.

It may ask you to delete some widgets - so just delete them. (Widgets are the extra page element added to the sidebars).

Save it. You're done! View your new blog.


Download here


or

Download here


Next step: Save in your computer


Upload the template


and Save it.

View the blog. This is the original PhotoblogIII template

Go to back the Layout > Template > Edit HTML page.
Click the Expand Widget Templates (EWT) button.


Now we will change some codes.


Please follow next 18 little steps.


The end of the procedure your new blog will be very professional and beautiful.


Click here to start.


Read more...

The original Photoblog3 Template


Read more about this template

Read more...

Menthol Photoblog Theme

Read more...

Photoblog3 Template colors

Read more...

Photoblog3 page elements

Read more...

Do it Yourself!

After these steps your new blog will be professional and very nice, and you will be happy with it.
But listen and be very careful!

Step 1. Design

Select all and copy this section in the textbox. Go to your Layout > Template > Edit HTML page.

Click the Expand Widget Templates (EWT) button then search for this section in your template code:

/*-------- Blogger Template design: Joy.................................Ourblogtemplates.com-------- */

Select it and paste it the new section.

Save the template and go to the next step.


Step 2. Variable definitions

Go to the Layout > Fonts and Colors Tab.
Click the name of the page element in the textbox (left side), and Edit Color Hex Code (right side):
Select, Copy and Paste or type manual the code, push enter and go to the next line etc…
Every page elements and codes are in this textbox what you must to change.
When you are ready click to Save Changes, View the blog and go to the next step.

Step 3. Global

Select all and copy this section in the textbox. Go to your Layout > Template > Edit HTML page.
Listen to the Expand Widget Templates (EWT) button then
search for this section in your template code:

/* ----- GLOBAL ----- Blogger template design by Ourblogtemplates.com ……………............../* visibility: hidden; */ /* display: none; */ }

Select it and paste it the new section. Save the template and go to the next step.

Step 4. Top Ads

Select all and copy this section in the textbox. Go to your Layout > Template > Edit HTML page.
Listen to the EWT button then
search for this section in your template code:

/* ----- TOP ADS ----- Blogger template design by...............................#topads .widget {margin: 0; padding: 5px 0;}

Select it and paste it the new section. Save the template and go to the next step.

Step 5. Header

Select all and copy this section in the textbox. Go to your Layout > Template > Edit HTML page.
Listen to the EWT button then
search for this section in your template code:

/* ----- HEADER ----- Blogger template design by....................padding: 0px 0px 0px 0px; border: 0; }

Select it and paste it the new section. Save the template and go to the next step.

Step 6. Linkbar

Select all and copy this section in the textbox. Go to your Layout > Template > Edit HTML page.
Listen to the EWT button then
search for this section in your template code:

/* ----- LINKBAR ----- Blogger template design by........................background: $linkbarHoverBgColor; }

Select it and paste it the new section. Save the template and go to the next step.

Step 7. Middle Ads

Select all and copy this section in the textbox. Go to your Layout > Template > Edit HTML page.
Listen to the EWT button then
search for this section in your template code:

/* ----- MIDDLE ADS ----- Blogger template design by.........................background: $middlebarbgColor; }

Select it and paste it the new section. Save the template and go to the next step.

Step 8. Main

Select all and copy this section in the textbox. Go to your Layout > Template > Edit HTML page.
Listen to the EWT button then
search for this section in your template code:

/* ----- MAIN ----- Blogger template design by .....................border: 1px solid $imageBorderColor; }

Select it and paste it the new section. Save the template and go to the next step.

Step 9. Post Footer

Select all and copy this section in the textbox. Go to your Layout > Template > Edit HTML page.
Listen to the EWT button then
search for this section in your template code:

/* ----- POST-FOOTER ----- Blogger template design by......................feed-links a:hover {color: $mainHoverLinkColor}

Select it and paste it the new section. Save the template and go to the next step.

Step 10. Blockquote

Select all and copy this section in the textbox. Go to your Layout > Template > Edit HTML page.
Listen to the EWT button then
search for this section in your template code:

/* ----- BLOCKQUOTE ----- */ blockquote { ..............border: 2px solid $blockquoteBorderColor; }

Select it and paste it the new section. Save the template and go to the next step.

Step 11. Sidebar

Select all and copy this section in the textbox. Go to your Layout > Template > Edit HTML page.
Listen to the EWT button then
search for this section in your template code:

/* ----- SIDEBAR ----- Blogger template design by...............sidebar a img { margin: 0px 0px 0px 0px; padding: 0px 0px 0px 0px; }

Select it and paste it the new section. Save the template and go to the next step.

Step 12. Comment

Select all and copy this section in the textbox. Go to your Layout > Template > Edit HTML page.
Listen to the EWT button then
search for this section in your template code:

/* ----- COMMENT ----- Blogger template design by................../* respecified, for ie5/mac's benefit */ padding-left: 0px; }

Select it and paste it the new section. Save the template and go to the next step.

Step 13. Lower Section

Select all and copy this section in the textbox. Go to your Layout > Template > Edit HTML page.
Listen to the EWT button then
search for this section in your template code:

/* ----- LOWER SECTION ----- Blogger template design by.................color: $lowerbarVisitedLinkColor;}

Select it and paste it the new section. Save the template and go to the next step.

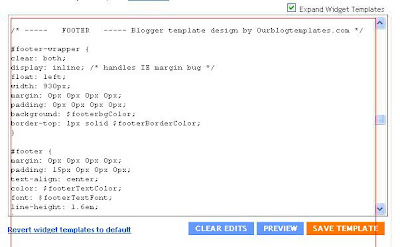
Step14. Footer

Select all and copy this section in the textbox. Go to your Layout > Template > Edit HTML page.
Listen to the EWT button then
search for this section in your template code:

/* ----- FOOTER ----- Blogger template design by..................color: $footerVisitedLinkColor; text-decoration: none; }

Select it and paste it the new section. Save the template and go to the next step.

Step 15. Credit

Select all and copy this section in the textbox. Go to your Layout > Template > Edit HTML page.
Listen to the EWT button then
search for this section in your template code:

/* ----- CREDIT ----- */.................color: $postbgColor; text-decoration: underline; }

Select it and paste it the new section. Save the template and go to the next step.

Step 16. Page structure : Comment Box

Go to your Layout > Template > Edit HTML page.
Listen to the EWT button then
search for this line in the code:

     <b:b:include data='post' name='comments'/>

and change it:

     <b:include data="post" name="comment-form"/>

Be careful!

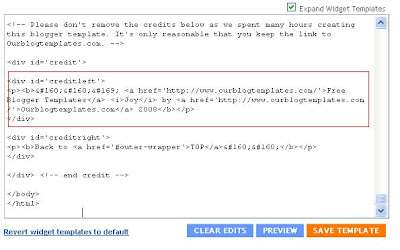
Step 17. Page Structure: Credit left

Select all and copy this section in the textbox. Go to your Layout > Template > Edit HTML page.
Listen to the EWT button then
search for this section in your template code:

< div id='creditleft' >..........Ourblogtemplates.com< /a > 2008< /b >< /p > < /div >

Select it and paste it the new section. Save the template and go to the next step.

Step 18. "Read more..." code - Expandable Posts function


What is it? How to use it?

Select all and copy this code in the textbox
Go to the Settings --> Formatting tab.
Paste the code into the Post Template form at the bottom. And save it.


How to post large photos and images?


The width you use for this photoblog is 680px.

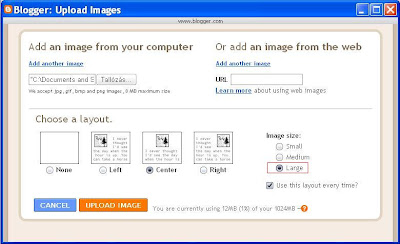
If you use the Blogger's Add Image button, the largest image you can post will be much smaller than this:


You can store your photos in an online image hosting service.
The free Photobucket is very good, I would suggest it.

To post the photo or image, type the code below in the Blogger text Editor:

Copy the direct link to the photo you want to post.

If your picture is bigger than 680px width, use the code below to post your large photos:

Change PhotoURL to the actual URL (the direct link) of the photo you want to post

     <img src="http://PhotoURL" width="680px"/>"

For example:

     <img src="http://i569.photobucket.com/albums/ss137/klaragergencsik/193.jpg" width="680px"/>


If your picture is smaller than 680px width, use this code:

     <img src="http://PhotoURL" width="100%"/>

The height will adjust accordingly to keep the original image aspect ratio.

Click here to learn more
Congratulation! Your new professional blog is complete. View and enjoy it.

About This Blog

Professional Blogger Templates by Ourblogtemplates.com
Modify by Klara-web
My Top Travel Tips
Real Adventures, Accommodations and Resorts, Active Adventures and Sports, Cruises, Educational Travel, Local Attractions, Nature and Wildlife Tours, Snow and Ski, Travel Inspiration, Travel Service
Read more
BannerFans.com
Sign up for PayPal and start accepting credit card payments instantly.

  © Free Blogger Templates Photoblog III by Ourblogtemplates.com 2008 - Menthol Photoblog theme design by - klaraweb - 2009

Back to TOP  

Website counter